Fixes for Face ID Not Working on Any iPhone (iOS 16.5.1 Update) – Top 6 Fixes to Try

Face ID has become an integral part of the whole security and privacy system of our iPhones. From preventing unsolicited access to ensuring that every user has their right to data privacy, this feature has come as a boon.
However, with the convenience comes complications. The majority of iPhone users have reported experiencing issues regarding their device’s Face ID not working as it should. If you have been experiencing a similar issue, well, you aren’t the only one.
This article will explore everything you need to know about your iPhone’s Face ID not working and how you can fix it.
Table Of Contents
Why is the Face ID Not Working on an iPhone?
Before we familiarize you with some of the steps to fix the Face ID not working, let us understand a few potential reasons why the error is occurring in the first place.
- Minor software issues or bugs in the iOS 16.5.1 update may interfere with Face ID’s functionality.
- Face ID might have been accidentally turned off or some settings related to it could have been altered.
- Dust, smudges, or debris on the front-facing camera and sensors can hinder Face ID’s accuracy.
- The installed iOS 16.5.1 update might not be fully compatible with Face ID, leading to errors.
- Dimly lit environments might make it difficult for Face ID to scan and recognize the user’s face accurately.
- Covering part of the face, wearing masks, or holding objects in front of the face can prevent Face ID from working correctly.
These are just a bunch of potential reasons why the Face ID isn’t working as it should. Identifying the problem and then implementing a relevant fix is crucial in that case.
How to Fix Face ID Not Working on iPhone?
Now that you have a basic understanding of the reasons that could be altering the function of the Face ID, let us explore a few effective ways that can help fix the issue proactively:
1. Restart the iPhone
Sometimes, the easiest fix is what works out well in the end. If the Face ID error is due to a temporary software glitch, restarting does a soft reboot of the iPhone, rectifying the error or the glitch that was contributing to the issue in the first place.
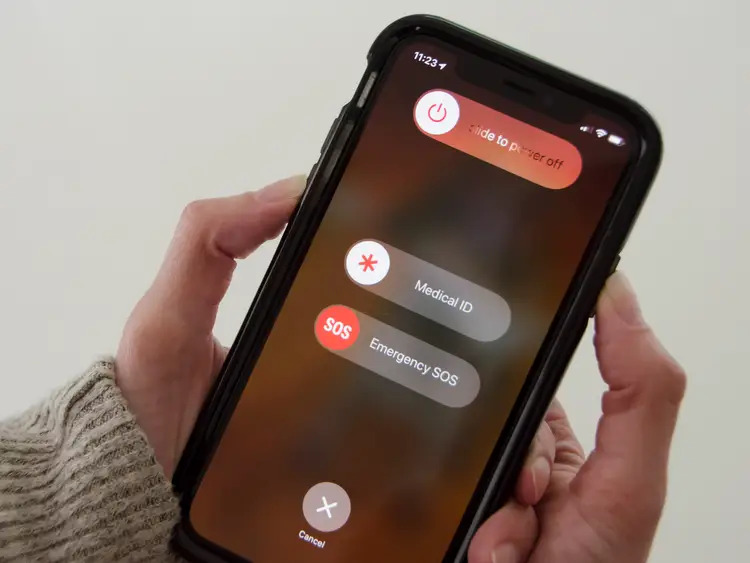
Here’s how to restart your iPhone:
- Press and hold the power button and either volume button simultaneously.
- Keep pressing that until the “slide to power off” slider appears on the iPhone’s display.
- Slide the slider to turn off the device.
- Once done, press and hold the side button again until the Apple logo appears on the screen.
Doing so should restart the iPhone and you are good to use the device as normal. Once restarted, check if the Face ID is working normally.
2. Cross-check the Face ID Settings
We don’t realize this but some features in the Face ID settings might be disabled, which could be contributing to the error while you are trying to unlock your iPhone. You can check the Face ID settings by following the steps:
- Unlock your iPhone and open Settings.
- Navigate to “Face ID and Passcode.”
- Under that, you have to check if the Face ID is enabled and is set up as it should.
If you find that something is disabled or the set-up hasn’t been done properly, you must fix that immediately.
3. Re-register your Face
Once you are done cross-checking the Face ID settings and you see that everything is properly set up, the next fix is to re-register your face. This will enhance the accuracy and responsiveness of the feature, fixing things.
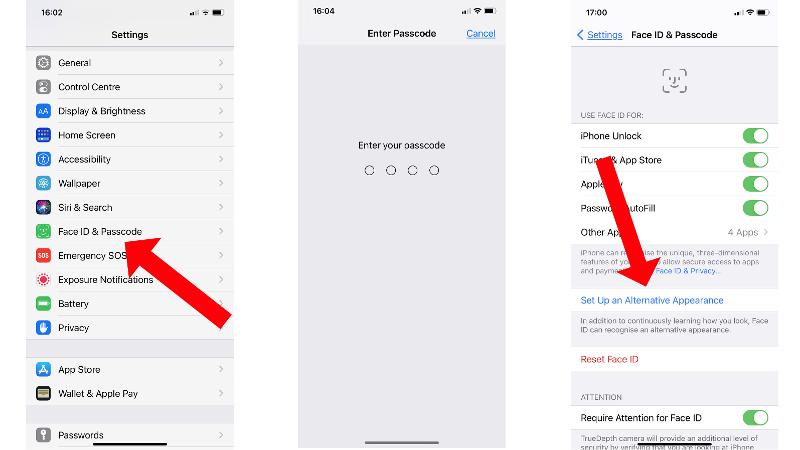
- Navigate to Settings on your iPhone.
- Under that, go to “Face ID and Passcode.”
- Enter the device’s passcode for verification.
- Tap “Set up Face ID” and follow the on-screen instructions.
Once done, you’d have to register the new input in the settings and then you can try and see if the Face ID error is persistent or not.
4. Remove Face ID and set up new
This might seem similar to the previous tip but this particular step involves a complete reset. In this, you’d remove all the existing Face ID data and then set things up from scratch and without any further hassle.
Here’s what you need to do:
- Go to Settings on your iPhone.
- Click on “Face ID and Passcode.”
- Enter the device’s passcode for verification.
- Tap on “Reset Face ID”
- Set up a new Face ID following the on-screen instructions that come on the screen.
That’s pretty much it. Once you are done setting up the new Face ID, lock your iPhone and see if the Face ID is working as it should.
5. Update your iOS
Sometimes, outdated firmware is the pivotal reason why your Face ID feature isn’t working. This could be a direct consequence of an existing software bug in the iPhone you are using. So, updating your device is the easiest way to navigate through the issue.
Here’s what you need to do:
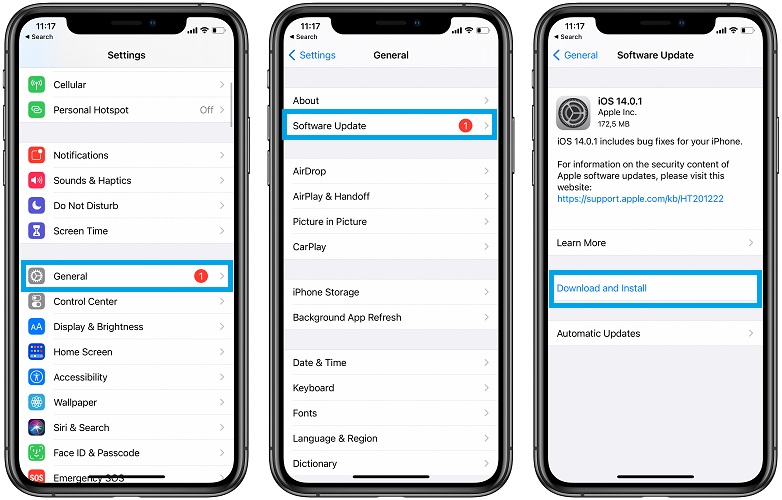
- Unlock your iPhone and open Settings.
- Tap on General.
- Navigate to “Software Update.”
If you find a new update available, click on it to start the software update process. It will take some time for the update to download and then comes the installation process.
6. Restore your iPhone
The last tip you can try to fix the Face ID not working is by restoring your iPhone. This will resort your iPhone to the factory default settings or the settings that you bought the iPhone with.
As it sounds, it leads to data loss, so ensure that you have a backup. Then, follow the steps:
- Connect the iPhone to a PC or Mac.
- Back up the data.
- In iTunes, select your iPhone.
- Tap on “Restore iPhone” and confirm the action.
Lastly, follow the on-screen instructions as they come and your iPhone should be reset to the factory settings.
Conclusion
Face ID not working on your iPhone can be frustrating and a pain. However, there are easy ways to identify the error and then fix it accordingly. If you have been experiencing similar issues, we hope this article gives you all the insights that you need to get started.


![How To Connect Xbox 360 Controller To PC Without Receiver [Step By Step]](https://graphicreporter.com/wp-content/uploads/2022/08/How-To-Connect-Xbox-360-Controller-To-PC-Without-Receiver--768x432.png)
